
You’ve just installed your brand new shed and it looks amazing. Then a torrential downpour hits and you’ve got pools of water making a moat around your shed. You probably need shed guttering and you’ll need to learn how to put gutters on a shed – fast.
Keeping water away from your structure is important for many reasons. You’ve got to protect your foundation and also prevent water from getting into your shed. Gutters will redirect water into downspouts, and from there you can direct it away from the shed.
In this article, we’ll take a look at the best options out there today for shed guttering. Then, we’ll discuss how to install shed gutters so that they last and keep your shed from floating away during the next rainstorm.
Quick Navigation

Why Put Gutters on a Shed
As mentioned in the intro, you’ve got to protect your shed foundation. Even if you’ve raised your shed on skids or blocks, water can erode the base beneath those objects and cause your entire shed to tilt, slip, or even topple over in a worst-case scenario.
If you have a concrete slab, then standing water around the concrete can cause water to seep underneath and then up into your slab. Moisture can travel up through concrete if it doesn’t have a way out.
Moisture pooling around your foundation will eventually make its way into your shed. This is bad for many obvious reasons, from damaged shed contents to the bottom of your shed exterior that will be prone to rotting and structural damage if the water problem persists.
Lastly, if you have a shed, why not use the runoff and divert it into a rain barrel? You’d be amazed how quickly a couple of good, hard rains can fill up a large container. Simply divert your downspout into the barrel and attach a hose to the bottom. Why pay for water when nature provides it for free.
Best Options for Shed Guttering
Shed guttering, not surprisingly, comes in all shapes and sizes. Luckily, finding the best shed guttering system for your shed isn’t too difficult. Take a look below as I outline the best options for guttering your shed.
1. Vinyl

Vinyl gutters are cheap and easy to install. They are also readily available at any home reno store along with all the accessories such as gutter brackets, caps, and drainpipes. For this reason, most shed gutters are often vinyl.
Although they’re convenient, they are not as durable as other options. Vinyl is prone to chipping or cracking in extreme cold or under duress – such as if a branch falls on it. I’ve also known vinyl to crack if a ladder sits against it. That gives you an idea of just how little it takes to damage a vinyl gutter.
Keep in mind that most of us won’t touch our shed gutters after we install them. If you live in a moderate climate and don’t anticipate any debris falling on your shed, then vinyl is your choice.
Another factor to consider is that vinyl comes in white and looks cheap. If you care about how your shed looks, then don’t choose vinyl. The boxy, plastic look of vinyl isn’t going to win your shed any beauty contests, but it will keep the rain away from your shed structure for a low cost.
2. Aluminum

The most common option for homes, aluminum gutters are durable and come in many different colors. These gutters are a great option for your shed because you can match them to those on your home. They are more expensive than vinyl but still won’t break the bank.
Your house likely has aluminum because they can be made to any length without seams – however, this is usually done by a contractor. You can purchase shed aluminum gutters in any home reno store in up to 16’ foot lengths. This allows you to avoid having two pieces of gutter connected with a bracket.
If you have an extra-long shed – more than 16’ – then you’ll either need a contractor or your sheet metal brake to make one long, seamless gutter for that side.
You won’t need the same diameter of gutter that you use on your house. Aluminum gutters come in 3 and 4” versions instead of the standard 5”, which is most common on homes.
3. Wood
While not the most common option, wood gutters do exist and are quite functional as shed gutters. Many people choose these gutters because they look nice and also hold up over time.
Like any exterior wood product, wood gutters require more maintenance than vinyl or aluminum. First, you’ll have to keep them cleaned out regularly. If you clean your gutters once or twice a year like most people, then get ready to do it a whole lot more with shed wood gutters.
Excessive debris can rot wood gutters if it isn’t taken care of quickly enough. On the other hand, if you keep up with regular maintenance, then you won’t have to worry about wood gutters failing. Annual or bi-annual oiling of your gutter, as well as cleaning more frequently, is a must. Heavy-duty oil for the interior of the gutter, such as motor oil, will ensure your gutters last.
If you install wood gutters, you’ll have to cut them to length to fit your shed. It is critical that you seal the end grain sections, which is where they are most likely to rot. Using a high-grade polyurethane sealant will help. This increases the time and cost of your wood gutter project.
You also will not likely use a wood downspout to go along with your wood gutters. When installing wood gutters, you’ll have to consider using an aluminum or other type of downspout to go with your wood guttering.
Wood gutters are expensive. Expect to pay at least triple the cost of aluminum gutters. They use high-grade cedar, and since it has to come in long lengths it isn’t cheap. On the plus side, there are a variety of designs you can get. Many older homes use wood guttering that is milled to look like molding. Thus you can dress up your shed with wood guttering.
4. Rainhandler
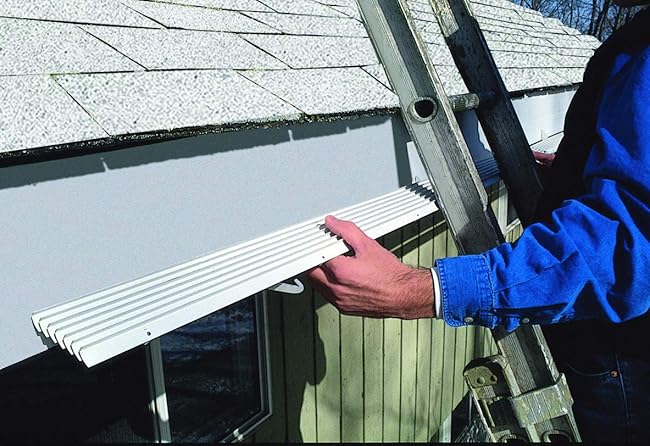
Rainhandler is a “no-gutter” option designed for sheds or homes that negates the need for guttering altogether. There are many different brands out there, and Rainhandler is just one of them.
The operation of a Rainhandler system is simple – it is essentially just a drip edge on steroids. Once installed, these are louvered strips of PVC that sit just below the edge of the roof. They catch the water and divert it to a downspout.
Rainhandler claims that debris will just slide right off, instead of sitting inside a traditional gutter. Simple to install and maintain, this is a viable option for shed owners. However, you still need a downspout and diversion from the downspout away from your shed.
These non-gutter options are great for folks who want to do as little maintenance as possible on their shed guttering. On the other hand, these are fairly new systems and long term evaluation of these products isn’t available yet.
5. Mini Gutters
Mini gutter systems for sheds come in all types of material. They are narrow guttering, usually 3” in diameter or less. They come with clamps or brackets depending on if you have fascia board or not.
A very common small rain gutter choice for sheds, mini gutters are quick to install and make sense for sheds that have a relatively small roof surface area.
If you live in an area that receives significant rainstorms, then you’ll need to evaluate if mini gutters are the best option for you. Large downpours can overpower smaller gutters, especially if they are smaller than 3” in diameter, and can compromise the foundation of your shed if the water is overflowing from the mini gutters.
Mini gutter systems often come in a kit, specifically designed for sheds. If you are unsure if you can install shed gutters yourself, the kits make it easy as all parts from brackets to downspouts and fasteners are included.
6. Rainsaver
The Rainsaver is a proprietary brand that is just one of many similar types of clamp-on guttering designed specifically for sheds. The idea behind the Rainsaver brand is that it is ultra-easy to install and cheap.
This type of guttering for sheds is PVC, so it is quite durable. It fits into specially designed brackets that feature screw clamps, with large knobs that make it easy to install with just one person. They are designed for sheds because they are made for roofs without fascia board.
Since the clamps only open up to 3”, they aren’t designed to fit the width of even a 2×4. Thus, they are made to clamp on top of the roofing material and underneath the sheathing. The gutter sits just below. The bracket allows for the guttering to rotate based on the pitch of the roof, so it will always be horizontal to the ground.
One of the downsides to this type of guttering is that it is not aesthetically pleasing. Also, the threaded end of the bracket sits inside the gutter, so debris is easily trapped and could cause clogs fairly readily.
How to Install Guttering on a Shed
Installing guttering on a shed is straightforward. Make sure you have all your gutter accessories before you begin because the job moves quickly once you get started.
Step #1 – Design a Guttering System and Prep Materials
Your system depends on whether or not you have a fascia board. If you don’t, then you are limited to clamp-on systems or DIY guttering. You may be able to use traditional guttering materials, but make sure they come with straps to attach on top of your roofing material.
Another consideration is the type of climate where you live. Snow and ice can wreak havoc on gutters. Chunks of snow that melt off in spring can take an entire length of the gutter right off a roof. Melting and freezing of water can also weigh down gutters. If this sounds like your neck of the woods, then avoid vinyl, which tends to be pretty flimsy compared to other options.
Also, think about the amount of rain you get. Using narrow, small diameter guttering might not carry away all the water you get during torrential downpours.
Lastly, the location of your downspout is the most important decision you’ll make regarding gutters. You must choose a location for your downspout that is graded away from your shed. If you need to, you can buy a really long flexible hose to attach to the bottom of your spout to move the water far from your shed.
Step #2 – Mark Locations of Your Gutter Brackets
Mark the locations of where your gutter brackets are going to go, either on your fascia board or along your shed roof if using straps. Be sure to place them at a maximum of 3 feet apart. If you get lots of ice and snow, then space your brackets or straps no further than 2 feet apart.
Remember, as you mark your bracket locations, also be sure to note where your downspout will go. Your entire guttering system will need to be angled downward toward the downspout so that the bracket furthest away from the downspout will slope down towards the spout.
When anchoring brackets to your shed fascia board, use screws. Over time, you may need to alter the bracket placement to better facilitate water flow.
Step #3 – Cut and Join Your Gutters
Cut your guttering to length. If you need to join two pieces, make sure you have the appropriate connectors to do so. Common shed guttering systems will have connectors that you simply slide either end of a gutter piece into for a nice, flush connection.
Remember that either end of your guttering will need an end cap, which simply ensures the water is directed toward a downspout and not out either end of your gutter.
Some people add a bead of silicone or other waterproofing material to the inside of their end caps and connectors. These accessories should be watertight without those extra measures, but it doesn’t hurt to add a little extra protection, either.
Lastly, install the downspout end of your guttering on the side of the shed where you want the water to outlet. Pick the end of your shed that has a decent slope away from the shed, so water doesn’t pool near your shed foundation.
Step #4 – Install the Downspout
Since most shed roofs have some sort of overhang, you might not want your downspout to go directly vertical from the gutter to the ground. That would leave it hanging away from the actual structure and would look strange. You also wouldn’t be able to anchor it to the shed.
You’ll need a couple of downspout elbow pieces and a long, flexible pipe at the bottom so you can direct gutter outflow where you want to. Make sure you pick up some brackets that can hold the gutter against the side of the shed to keep it in place.
Make Homemade Shed Gutters
If the above options don’t suit you, then you can make your own. There are tons of DIYers out there who have created their gutters with half a PVC pipe or a couple of planks of wood.
DIY wood gutters require significant sealing or a liner. The most common design is to build a box-type wood gutter, flush with the rafters. Then you line the gutter with metal flashing, copper, rubber, or any other waterproof material. You’ll also have to fashion a downspout and connect it to the gutter.
Using an old PVC pipe is arguable the simplest option. If you have a fascia board, then you can saw the pipe in half and nail it to the fascia. Use a table saw or go old-fashioned and use a handsaw. You can also use metal strapping to attach it and it can hang off the side of your roof.
Others have re-used old aluminum panels, such as siding or roofing, and molded them into gutters. This requires more work and heavy-duty gloves, as you have to shape the aluminum into a gutter shape. They mount to the roof with straps and can be quite durable if done right.
If you opt to use straps to attach your DIY gutters to your shed, make sure you add some roofing sealant to the screw or nail you’ve put into your roof to hold the strap. Also, see if you can add a backing board beneath the roof sheathing where the screw will be inserted for added strength since gutters in heavy rain and snow are put under a force.
Conclusion
Remember to carefully consider all your options, and that even though a guttering system might look really good, your focus should always be functionality over aesthetics. A great guttering system should keep the area around your shed free from pooling water, even during the worst rainstorm.
Thanks for taking the time to read about the best options for a shed guttering system. I hope you found it helpful and that you can apply some of this information to your shed guttering install.