

Ever opened the garage door and can’t find anything, or fit the car in? The yard is cluttered with kids’ bikes and the snow shovels greet visitors at the door in the summer? Where to put it all?
You need a shed! Everyone has a shed! They lean this way or that way, the door sticks, or the floor rots out. Some are wood, others plastic or steel, do-it-yourself or prebuilt. Where to start?
The best place to start is the shed foundation. A proper shed base will support the type of shed you build or buy. What kind of shed foundation do you need? What are their pros and cons of each? What’s on-grade or permanent? Do you need a Building Permit? What will it all cost?
This article about most popular shed foundations will help answer these questions. It’ll help you decide on the best foundation for your shed.
Quick Navigation
- Does My Shed Need a Foundation?
- Contact Your Local Building Inspector
- On-Grade vs Permanent Shed Foundation
- Popular Types of Foundations Used for Sheds
- #1 Shed Foundation with Concrete Pavers
- #2 Solid Concrete Blocks
- #3 Deck Blocks
- #4 Gravel Pad and Timber Frame
- #5 Skid Foundations
- #6 Plastic Shed Foundations (or Plastic Garden Shed Base Grid)
- #7 Shed Foundation Kit from Manufacturer
- #8 Concrete Piers and Beams Foundation for a Shed
- #9 Concrete Slab – Best Shed Foundation
- #10 Post and Beams
- #11 Screw Piles
- #12 Adjustable Shed Base
- #13 Pier Block Elevated Post Base
- #14 Anchor Ground Spikes
- #15. Footing Pads
- #16. Deck Foot Anchors
- How to Choose the Right Foundation for My Shed?
Does My Shed Need a Foundation?
Ever stood in your yard after it rains? Your feet get wet. The same thing happens to your shed. If it sits on the ground, it will get wet from the ground moisture. This will cause wood to rot and metal to rust. It will cause the contents of the shed to be damp.
Additionally, the ground isn’t flat. Uneven ground makes doors stick and affects the stability of your shed. A foundation lifts your shed off the ground. It provides a stable and level base so the doors open, and your shed lasts longer.
Contact Your Local Building Inspector
Before you begin any construction project, you should consult your local Building Inspector. If you don’t you could face fines and/or have to remove what you’ve built.
Some communities have restrictions on the size and style of outbuildings (sheds). The Inspector will know the limits and are often a fountain of information. They will inform you about any setbacks or easements to respect.
They should also be familiar with soil types in their local. If you need a Building Permit, they’ll let you know that too.
On-Grade vs Permanent Shed Foundation
An On-Grade shed foundation is one that sits on the ground. It can be a skid, gravel, patio stone, block or post, or even plastic construction. In 20 years you could remove your shed.
Take the shed base out is as easy as putting it in, rake it over, plant grass seed, and it would disappear. A Permanent Foundation is just that, permanent.
It’s a concrete slab, excavated block or poured wall, or concrete pier. In 20 years it will still need a lot of work to remove. The pros and cons of each are below.
Popular Types of Foundations Used for Sheds
[ninja_tables id=”8436″] On-grade Shed Foundations#1 Shed Foundation with Concrete Pavers

An easy shed foundation for the beginner and good for prebuilt or a home built sheds. A foundation of pavers sits on leveled exposed ground or a sand base. They provide a solid flat base upon which to build or set a shed and evenly support the shed floor.
The bigger the paver, the heavier it is, but the fewer you need. Pavers are great on flat ground for smaller sheds of wood, metal, or plastic construction with or without a floor. Using pavers places the entry close to, or on the ground so good for riding lawn mowers or quads.
Complexity: Easy
Once the ground is level, pavers are easy to lay. If placed on the sand there’s an extra step leveling before putting the pavers. Sand does make it easier to level the pavers too.
Construction Cost: $100.00-$200.00
The cost of pavers depends on their size, color and shape. Some large pavers are available with steel mesh inside them but are more expensive. I prefer 24”x24” or 24”x30” (heavier but cover more). Adding a sand layer increases the cost too.
- Throughout the build, check your levels.
- Use sand to make leveling easier.
- Garden cloth under the pavers helps reduce weeds coming up in the cracks.
- Don’t make it larger than the shed base as roof run-off can pool and seep into your shed.
Pros
- Available in several colors, shapes and sizes
- Quick and easy install
- Continuous support of shed floor, or makes a good floor
- Can secure shed/walls to pavers
Cons
- Can settle into the soil over time
- Pavers become uneven to each other
- Can crack with heavy loads
- Not suitable for large sheds
#2 Solid Concrete Blocks

Image courtesy of finehomebuilding.com
A relatively easy shed foundation for the beginner and a good base for any sized shed. Good for prefab or home built sheds. Concrete blocks are square or rectangular in shape.
Only use solid-concrete blocks. They sit on the ground and need to be level, and level with each other. Shed dimensions and ground slope dictate how many blocks you need.
The sloped ground may need stacked blocks to form a tower level with other block towers. Support the corners and every 6’ to 8’ on the perimeter (closer if for heavy equipment) and the middle area. An 8’x12’ shed would use 6 blocks, more if you use towers for leveling.
Complexity: Relatively Easy
You are not leveling the ground, only the foundation blocks. The difficult steps are leveling the blocks with each other and squaring the corners. The level of difficulty increases for sloped ground.
Construction Cost: $0.00 – $100.00
The cost of solid-concrete blocks depends on their size and shape. The number required will depend on the dimensions of the shed and the slope of the ground. How high off the ground you want the shed to be is also a factor.
- Suitable for flat yard or slopes with a difference of 24” or less for the run of the shed
- Always re-check your levels as you build your shed foundation. Great for use with any shed material
- Use for sheds, cabins and cottages
- Not ideal for heavy machinery due to structural weight bearing and possible vibration issues
- The shed floor isn’t fully supported and vibrations can cause block towers to shift
- Available in several shapes and sizes (12”x12”x4”, 4”x 8”x16”, 2”x8”x16”)
- Quick and easy to install
- Easy to stack and level
- Good for small or large sheds
Cons
- Can sink over time on the wet soil
- The distance between blocks is not supported
- Not suitable for slopes of greater than 24”
#3 Deck Blocks

An excellent foundation for any size shed. It is also fairly easy for a novice DIYer. Good for prefab or home built sheds. Deck blocks are square based-pyramidal in shape.
They have channels in the top for wooden framing. They sit on the ground and need to be level, and level with each other. Shed dimensions determine the number of blocks you need.
Support each corner and every 6’ to 8’ on the perimeter (closer if for heavy equipment) and through the middle area. An 8’x12’ shed would use 6 deck blocks – 3 per long side. Good for flat lot, not slopes.
Great for use with any shed material. Use for sheds, cabins and cottages. Places the shed closer to the ground; so easy access for lawn mowers or quads.
Not ideal for heavy machinery due to structural weight bearing as the shed floor isn’t fully supported.
Complexity: Relatively Easy
You are not leveling the ground, only the deck blocks. The difficult steps are leveling the deck blocks to each other and squaring the corners.
Construction Cost: $0.00 – $100.00
Deck blocks and patio stones are similar in price. The number required is less though and depends on the dimensions of the shed.
- Quick and easy to install
- Easy to leveled
- Good for small or large sheds
Cons
- Can sink over time
- The distance between blocks is not supported
- Not good for sloped surface
#4 Gravel Pad and Timber Frame

Image courtesy of Classic Buildings
A relatively easy foundation for any size shed and great for ready-made or home built sheds. The size makes this more difficult for the novice DIYer.
The gravel pad and timber frame shed foundation is good for the flat ground. Use pit-run or 1”-crusher run gravel. It has smaller particles in it and packs into a more stable base.
Compact the gravel using a gas powered compactor; working to keep the gravel level. The pad is on the ground and should be 2’ wider and longer than your shed.
Remove the sod and/or cover it with garden cloth, then spread out and tamp down the gravel. It should be 4”-6” thick and level. Shed dimensions dictate how large an area you need.
Place pressure treated 4”x4” (or 4”x6”, 6”x6”) timbers on the gravel in the same dimensions as the shed.
Use a half-lap joint where the timbers meet. Square the corners and level the lumber with each other. Drill the joints and hammer a length of rebar through into the ground.
Complexity: Relatively Easy
Level the ground or mask slight imperfections under the level gravel layer. Leveling the 4”x4’s to each other and squaring the corners are the difficult steps for this foundation.
Construction Cost: $200.00 – $400.00
The cost of gravel fluctuates with location. Rolls of garden cloth often go on sale. The amount of gravel and the number of 4”x4”s depends on the dimensions of the shed.
- A 6” gravel thickness is better than 4”
- The gravel base has to be level
- If you need to add a second layer of pressure treated lumber use galvanized spikes to join them to the layer below
- Recommend pre-drilling so it’s easier to nail
- Quick and easy to install
- Easy to leveled
- Shed is on or close to land level
- Use with sheds with or without a floor
- Good for smaller or large sheds
Cons
- Can sink over time on the wet soil
- Higher risk of ground contact and rot
- May need a drainage ditch
- May need a retaining wall to hold gravel in place
- Not suitable for sloped yard
Related: Popular Roof Styles for Sheds (With Pictures)
#5 Skid Foundations

Image courtesy of Shed to House
A skid shed foundation is a quick and easy way to support a shed and easy for even the beginner to build. We’re not talking commercial delivery skids. It comprises of 2 or more pressure treated 4”x4”s, 6”x6”s, 8”x8”s or even logs laid parallel to support the length of the building.
The shed sits on and is evenly supported by, the skids. The skids, also called runners, usually sit directly on the ground. This means you want relatively flat terrain.
Historically, the skids meant the shed could be skidded to another location. It is a good idea to dig a trench where the skids will lay, then tamp in gravel ensuring the surface is level and drained.
This will help protect the wood and make leveling easier. The trench should be wider and longer than your skid. I helped move a 10’x30’ cabin built 90+ years ago on log skids. We used ropes and a half to truck; the 100 yard move was easier than expected.
Complexity: Easy
Level the ground or mask slight imperfections under the level gravel layer. The difficult steps are leveling the skids themselves and to each other.
Construction Cost: $0.00 – $100.00
The amount of gravel (if used), plus the dimension and number of skids (determined by the shed size), affect the cost.
- A 6” gravel thickness in the trench is better than 4”
- The gravel has to be level
- The bigger the shed, the bigger the skid dimension should be
- You can use 2”x6” or 2”x8”s nailed together and sitting on the edge
- Quick and easy to install
- Easy to leveled
- Shed is movable
- Shed is on or close to land surface
- Good for smaller or large sheds
Cons
- Can sink over time on the wet soil
- Higher risk of ground contact and rot
- Not suitable for sloped lot
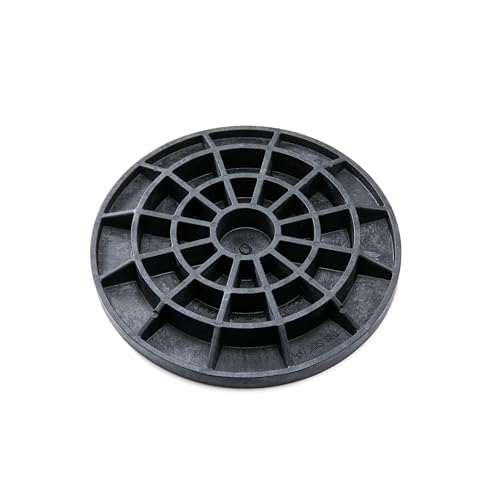
#6 Plastic Shed Foundations (or Plastic Garden Shed Base Grid)

A newer type of shed foundation made from recycled material. It’s easy for the beginner to put together and good for prebuilt or a home built sheds.
It sits directly on the ground, so the flat ground is best. It is similar to concrete paver construction, but much lighter. The ground preparation is easy, ensure it is firm, flat, and fill in any depressions and remove high spots.
 Once the ground is level, roll out the garden cloth. Place the interlocking grid blocks, connect together, and level. The blocks can even be cut to size with a hand saw.
Once the base is level, fill the open grid with pea gravel. The base should be the same dimensions as your shed, but can be wider.
The grid holds the pea gravel in place and allows moisture to percolate through. The grid also helps keep the base of the shed drier than concrete pavers.
The plastic grid shed foundation can be used for sheds with or without floors and provides even support for floors.
Ideal for use with riding lawn mowers or other wheeled equipment as it sits on or close to ground level. Available here.
Complexity: Easy
Level the ground or mask slight imperfections a sand layer. The difficult steps are leveling the grids themselves and to each other.
Construction Cost: $150.00 – $300.00
The amount of pea gravel, garden cloth, and number of grids affect the cost of construction.
- Quick and easy to install
- Easy leveled
- Shed is on or close to the land level
- Good for smaller or large sheds
Cons
- May sink over time
- Not widely available
- Not good for sloped ground
#7 Shed Foundation Kit from Manufacturer
 Arrow FDN1014 Storage Shed Base Kit
Some small shed manufacturers offer foundation kits for their sheds. Foundation kits are available in various styles.
They can be used for the manufactured shed, or to support other small sheds of the same size. It’s easy for the beginner to put together.
It sits on the ground which means you need a flat area. The foundation pieces may also be lighter weight for moving around.
The ground preparation is easy too. Ensure it is firm, flat, and fill in any depressions and remove high spots.
Prepare the ground. Place the foundation pieces (following the Manufacturer’s instructions), connect together, and level. The base should be the same dimensions as your shed.
You may have to purchase other required materials to complete some manufactured foundations.
Complexity: Easy
Leveling the ground and manufactured shed foundation are the difficult steps for this foundation. Reading and interpreting the instructions can be difficult too.
Construction Cost: $50.00 – $100.00
The cost of the kit, garden cloth, plus any required materials, set the cost (see today's price here).
- Use sand to level the ground and place garden cloth down before putting the foundation down
- Remember to recheck for level as you work
- Tighten all bolts/screws before they disappear under other structural materials.
- Quick and easy to install
- Easy to level
- Shed is on or close to ground level for easy access
- Good for smaller sheds
Cons
- May sink over time
- Higher risk of ground contact and rot/rusting
- Not good for sloped ground
- Often requires other materials be purchased
Permanent Shed Foundations
Always check with the Building Inspector before beginning any permanent foundation.
#8 Concrete Piers and Beams Foundation for a Shed

Image courtesy of Green Button Homes, LLC
An excellent shed foundation for any shed size, but more difficult to build. Good for home built sheds and some prefab.
The piers are concrete poured into holes dug or drilled into the ground to the frost line (or bedrock).
The holes should have 6”s of gravel in the bottom for drainage. There are plastic pier forms which can be set into an excavation dug to the frost line. They are then buried and filled with concrete (after being plumbed and leveled).
The most common though are cardboard tubes. They are placed into the holes, plumbed level and secured in place. Backfill the space around the tube, then fill with concrete.
All the tubes/forms need to be in aligned in their exact location on the string line. The piers need to line up with the framing they will attach to and support.
Each pier should extend at least 6” above ground level, but can extend higher if desired. The top of the concrete piers should be level with each other.
Pressure treated 4”x4” (6”x6”, 8”x8”) posts can sit on top of the concrete piers to provide a level surface for the pressure treated beams.
Before the concrete hardens in the piers, set pier or post ties and align in place. Shed dimensions determine the number of piers you need. An 8’x12’ shed would use 6 piers – 3 per long side.
Once the concrete piers have cured, beams can be set in place on the piers (or pier and post) and leveled with shims.
Suitable for flat ground or slopes.
Great for use with any shed material.
Use for sheds, cabins and cottages.
Complexity: Difficult
You are not leveling the ground, only how far the piers extend above the ground. Making the piers level vertically and horizontally increases the level of difficulty.
Construction Cost: $200.00 – $800.00
The poured concrete, number of tubes/forms, pier or post ties, plus dimension lumber for beams all affect the cost. The number of concrete piers required will depend on the dimensions of the shed. The distance to the frost line and the slope of the ground are also factors that affect the cost.
- Re-check your horizontal and vertical levels
- Triple check that the 4 corner posts remain square
- Set the 4 corners first, it makes it easier to square and level the other piers
- Good helpers are an asset.
- Great shed foundation for most soil conditions
- Exceptional for areas that experience frost
- Provide a permanent level base
- Good for small or large sheds
Cons
- Little forgiveness for errors.
- The distance between piers is not directly supported
- Difficult for the beginner
#9 Concrete Slab – Best Shed Foundation

A great foundation for any size shed: ready-made or home-built, a garage, or even a 2 story house. The different steps are what make this more difficult for the novice DIYer, and it’s a more difficult shed foundation to build.
Shed dimensions dictate how large an area you need. The finished concrete slab is strong enough to support vehicles and sits on the ground so it’s easy to drive in to. Ensure you have access to the concrete truck, or you may need a pumper truck or crane at added expense.
This is NOT a step-by-step for making a concrete slab. It identifies many of the steps you need to become knowledgeable about.
Set the 4 corner stakes, ensuring the corners are square. Use a string line and level to determine ground slopes. The more slope, the more material to move. If built on solid, well-drained soil your concrete slab will last longer.
Remove the sod and top 4” – 6” of soil creating a level base. Using 2”x12”s to form the perimeter; stake the corners and adjust so they are square and level. The thickness of concrete and gravel determines how high the forms need to be.
4”-6” of concrete on 6”-8”s gravel places your forms several inches off the ground. If placing rigid foam under the concrete pad you’ll need to raise the forms higher. If you want a 4” or 6” thick concrete pad, then the tamped gravel needs to level out 4” or 6”s below the top of the forms.
Once the forms are in place, they should be vertically braced and the top diagonally braced every 2 feet. Spread the 6” – 8” of gravel to fill the pad (You may need engineered gravel). Compact the gravel using a gas powered compactor; working to keep the gravel base level.
The perimeter of your gravel pad should slope downward to 2”s thick of gravel for the outside 12”s of the perimeter. This makes a footing which helps support the walls of your building.
Cover the concrete pad with 6 mil plastic (poly) sheet to help keep moisture out of your concrete pad once it sets. Use ½” rebar in the perimeter and lay a 4’ grid of rebar on the gravel pad. Bend it at the perimeter to connect with the perimeter rebar.
You can use 6”x6” steel mesh instead of the rebar grid. Use blocks or rebar rests to lift the rebar off the poly. You’re now ready to pour, screed, vibrate the perimeter, and finish the pad surface as desired – smooth, glossy, or brushed.
If attaching a sill plate, place anchor bolts every 4 feet around the perimeter before the concrete hardens (not in doorways). You may need expansion grooves cut in too depending on the size of the concrete slab foundation.
If it looks like rain, cover with plastic to protect the surface. Once the concrete is cured (24 hours), remove the forms. Before you backfill you may want to address any drainage issues.
Complexity: Difficult
There are many steps to this type of shed foundation. It is a permanent foundation, so mistakes are permanent.
Construction Cost: $2500.00 – $4000.00 (for a 300sqft pad)
The cost of materials will vary with location. Equipment rentals/hires and Building Code requirements also add to the cost.
- Hire an excavator to remove the soil and level the site
- Use a laser level to set the levels
- Use deck screws instead of nails to hold the forms; easier to make adjustments and to dismantle at the end of the project
- The forms can be used in the construction of your building, reducing cost and waste
- A permanent shed foundation
- Will support heavy loads
- Shed is on or close to the surface of the land for easy access
- Use for sheds with or without a floor
- Great for smaller or large sheds
Cons
- Needs to be above freezing for pouring
- Can crack over time if ground slumps or shifts
- Risk of ground contact and rot if the ground slope is wrong
- May need a drainage ditch
- May require a retaining wall to hold slopes in place
- Not suitable for sloped site
#10 Post and Beams

Image courtesy of StorageBuildingsUnlimited
This is a good foundation for any size shed; home built or prefab. It is similar to the concrete pier construction but more forgiving.
It uses 6”x6” or 8”x8” pressure treated posts placed in holes dug or drilled into the ground to the frost line (or bedrock). Only dig down as far as you need, the posts should sit on undisturbed soil. The holes should have gravel in the bottom for drainage.
You can mix and pour a bag of concrete into each hole too. The posts are placed into the holes, plumbed level and secured in place, then backfilled and tamped. Leave the packed soil mounded around the post.
All the shed foundation posts need to be in the exact location to line up with the framing they will attach to and support. Each post can extend several feet above ground level. The top of the posts can be leveled with each other after they are all set. They provide a level surface for the pressure treated beams to sit on.
Cut the posts level with each other, then notch for the beams (make sure to notch the correct side of each post).
Shed dimensions determine the number of posts you need. An 8’x12’ shed would use 6 posts – 3 per long side. Once the posts are notched, place the beam in place, drill holes for carriage bolts, and bolt into place.
Diagonal braces should be attached between the posts to beam for lateral support. Good for flat ground or slopes. Great for use with any shed material. Use for sheds, cabins and cottages.
Complexity: Slightly Difficult
You are not leveling the ground, only how far the posts extend above the ground. Making the posts level vertically and horizontally increases the level of difficulty.
Construction Cost: $200.00 – $800.00
Gravel, concrete, number and dimensions of posts, and beams all affect the cost. The number posts required will depend on the dimensions of the shed. The distance to the frost line and the slope of the ground are also factors that affect the cost. How high off the ground you want the shed to be must also be considered.
- Re-check your horizontal and vertical levels
- Triple check that the 4 corner posts remain square
- Set the 4 corners first, it makes it easier to square and level the other posts
- Good helpers are an asset
Pros
- Suitable for most soil conditions
- Excellent shed foundation for areas that experience frost
- Provide a permanent level base
- Good for small or large sheds
Cons
- A lot of planning for placement and leveling involved.
- The distance between posts is not directly supported
- Can be difficult for the beginner
#11 Screw Piles

Image courtesy technometalpost.com
This is a good foundation for any size shed or house; home built or prefab. Great for any soil type too.
It is similar to concrete pier and post and beam shed foundation construction. The screw piles are galvanized steel posts with a screw end. They come in a choice of lengths and diameters. Some need a small excavator with a special attachment to screw them into the ground to the frost line.
Other types use a special handheld powered screwdriver – hope you have strong wrists. The screw helps to prevent vertical frost lift. There is also minimal settling since the soil is undisturbed by digging.
Once in place, attach the beams and joists and build on. Suitable for flat ground or slopes. Great for use with any type material.
Complexity: Slightly Difficult
You are not leveling the ground, only how far the posts extend above the ground. Making the piles level vertically and horizontally increases the level of difficulty. This becomes Easy if you hire a certified installer and get a guarantee.
Construction Cost: $500.00 – $1000.00
The screw piles, a method of installation, and the lumber for the beams affect the cost. The number piles required will depend on the dimensions of the building. The distance to the frost line and the slope of the ground are also factors that affect the cost.
- Screw pile shed foundation is suitable for any soil conditions
- Excellent foundation for areas that experience frost
- Screw pile shed foundations provide a permanent level base for shed
- Good for small or large sheds
- A quick installation
Cons
- Screw pile shed foundations require specialized equipment or hired specialists.
- The distance between piles is not directly supported
#12 Adjustable Shed Base

Adjustable shed foundations are just that, adjustable. There are several different styles of adjustable shed foundation supports, like No products found., but most operate in a similar manner. They consist of a heavy-duty 3” to 7” wide beam or post bracket welded to a threaded rod with a large nut that allows 3-inches of adjustment. The threaded rod inserts into a metal tube welded to a metal plate, spike, or ground screw. The nut allows for adjustment to level the shed base prior to building or placing the shed, or if settling or frost heaves occur.
The receiving tube can be inserted into a concrete pier prior to curing so the plate rests on the surface, and the threaded rod slides into it, with the large nut acting as the stopper and adjustment mechanism. Alternatively, the plate can be set into the cavity of a deck block, on a patio stone, or on a concrete pad with the receiving tube sticking up. All components are made of galvanized steel, will support over 2700 pounds, and may be painted for added protection or aesthetics. For more information, check this article.
Complexity: Relatively Easy
Only the support bases need to be level, not the ground. Placing and squaring up the supports and leveling the blocks or digging, pouring, and leveling the piers are the most difficult steps. Difficulty increases with the number of supports required, and deviation in ground slopes.
Construction Cost: $10.00 to $100.00 per support
The cost of the adjustable support plus the deck block, patio stone, or concrete and sonotube affect the cost per support. The greater the shed size and ground slope, the higher the cost will be.
Pros
- Easy to install
- Leveling adjustment is easy
- Works well on small and large sheds
- Use for flat or sloped ground
Cons
- Ground clearance can make interior support adjustment difficult once the shed is built
- Multistep of adjustable support and its base can be difficult
- Expensive
#13 Pier Block Elevated Post Base

Pier block elevated post bases, such as those made by Simpson, consist of a galvanized steel threaded rod welded to a 4×4 or 6×6 post bracket; add a large nut and a washer provides for adjustment. The threaded shaft can be inserted into wet concrete, the center hole of certain deck blocks, or into a 3/4” to 1″ diameter 3-1/2” deep or more holes drilled into the receiving pad. The nut and washer on the threaded rod hold the post base at the desired level and allow for adjustment.
The base of the support flange with the nut and washer ensures the required 1” code-required standoff is met, helping to prevent moisture damage to the wooden supports. The washer sits directly on the concrete, and turning the nut adjusts the elevation. Simpson’s supports are rated for almost 2-tons, about 1,000 pounds more than their competitors, making them a strong, sturdy, durable shed foundation option.
Complexity: Easy to Medium
The adjustable nature of the supports, plus that they can support posts as well as beams, means there is little need for level ground. Only the receiving blocks or material must be properly spaced and strong enough to carry the load. Alignment and drilling the holes, plus leveling the support posts add to the complexity, as does the number of supports to align.
Construction Cost: $25.00 – $100.00 per support
The galvanized supports plus the washers and nuts have to be purchased, so the number required dictates the minimum cost. Solid precast deck blocks or pads, or pouring concrete add to the overall cost, as do the elevation requirements to provide a level shed base.
Pros
- Easy to install and adjust
- Very strong shed foundation for large or small sheds
- Use on sloped or flat ground
- Less prone to moisture damage
Cons:
- Combined cost of the supporting parts is expensive
- Adjustment can be difficult depending on clearances
- Frost heaves and settling can cause problems
#14 Anchor Ground Spikes

Anchor ground spikes, such as those by FirmerFix, are designed to support fences, but can also be used to support shed bases. The adjustable aspect is that the 4×4 post can be cut to the appropriate level to support the shed base. Made of heavy 12-gauge steel and powder coated for moisture protection, the 18” long tapered spike is hammered vertically into the ground. The 4×4 fits into a 6” deep box welded to the top of the spike, and is tightened into place with two bolts.
Use a short 12” to 18” length of 4×4 inserted into the ground spike’s box when hammering into the ground. This makes it easier to strike with a sledgehammer or mallet and also protects the metal from damage during installation. Frequently check that the spike is being driven vertically level into the ground between hammer strokes. Ground slope determines the length of the post to create a level base.
Complexity: Relatively Easy
The ground doesn’t need to be level, only the tops of the support posts. The difficult part is making sure the spikes are driven in level and the top of the posts are cut level with each other.
Construction Cost: $14.00 – $30.00 per support
Anchor ground spikes are similar in price with heavier gauge stainless steel spikes being more expensive. The additional cost is the length of 4×4 required for each spike to create a level base. The size of the shed determines the number of spikes needed.
Pros
- Quick and easy to install
- Use for level or sloped ground
- Easy to level
- Best for a smaller shed
Cons
- Spikes sink over time
- Require soil depth equal to spike length
- Not recommended for heavy structures
#15. Footing Pads

An easy-to-use shed foundation option is 10” to 24” diameter footing pads, such as those by FootingPad. The pads are lightweight and engineered to support load capacities that exceed those of concrete. Made of 100% recycled material, they can be used to support wood posts, under sonotubes, or to provide extra support to deck blocks or other precast concrete supports. The larger the diameter, the more load it is rated to support.
 Typical placement is below frost level at the leveled bottom of a post hole. The hole diameter needs to be two inches greater than the footing pad for insertion. The post, concrete tube form, or precast concrete support is placed on top, and the hole is backfilled while maintaining vertical level. The top of the posts is cut level to support the shed base with the weight resting on the footing pads. An alternative is to place a deck pad underneath a precast deck block to generate a more extensive footing base to minimize settling.
Complexity: Medium to Difficult
Digging post holes below the frost line, placing the pads level at the bottom of the holes, inserting the support post, pier, block, or tower, and ensuring everything is vertically level and the tops horizontally level, all add to the complexity of the task.
Construction Cost: $10.00 – $400.00 per support
Footing pads range from $12 for a 10” diameter pad to $65 for a 24” diameter pad, add the material for the support post that rests on the pad, and the cost climbs. The loads, support dimensions, and the number of supports all affect the overall cost.
Pros
- Ideal shed foundation for most soil conditions
- Great for regions that experience frost
- Exceptional for small or large sheds
- Support heavy structural loads
Cons
- Difficult for beginners
- Small margin for leveling errors
- Expensive
#16. Deck Foot Anchors

Deck foot anchors, such as those by Titan, combine an anchor screw or auger with a deck pad or load plate and a post bracket or saddle, all made from hot-dip galvanized steel. The anchors are made to support and anchor sheds or decks and have a weight capacity of more than 19,000-pounds. The design of the saddle helps keep wooden supports or beams 3/4″ to 1” above the ground to prevent ground contact and rot. Various saddle sizes and auger lengths are available for different post sizes and soil depths.
Installation is easy, just remove the sod where the anchor is to go and tamp in 3” of 1/2” gravel for drainage. Drive the anchor to ground level using a 1/2″ or 12mm socket with a 1/2″ impact wrench. Attach and tighten the load plate so it compresses against the ground until it stops at the stop washer at the top of the anchor. Once the plate is fastened, attach the saddle and secure it in place. Place a 4×4 cut to the necessary length in the saddle, secure with screws, and level vertically and horizontally with other posts.
Complexity: Easy to Medium
The most difficult part is identifying where the anchors go, removing the soil, and tamping in the gravel. Driving the anchor screw in, attaching the deck plate, and then attaching the saddle are all comparatively easy.
Construction Cost: $60.00 to $100.00 per support
Different anchors range in price, plus the size and length of support posts, and the number of anchors required affect the overall cost.
Pros
- Quick and easy to install and remove
- Anchors shed to the ground
- Work well for small or large sheds
- Ideal for flat or sloped ground
Cons
- Rocky soil can destroy the auger
- Soil type and composition affect the ease of installation
- Expensive
How to Choose the Right Foundation for My Shed?
Your choice of shed foundation is an important decision. It helps keep your shed level and dry, and provides a stable base for it. All extend the life of your storage shed.
Most on-grade shed foundations are easier to build and don’t need a lot of special tools or expertise. Select the one that fits the type of shed you want it to support, and the location you want it to in. Your Building Inspector can answer many of your questions too.
Permanent shed foundations tend to be more complicated and may need more ability. This doesn’t mean you can’t do it; it means you need to become more knowledgeable about your choice of foundation. Always involve the Building Inspector with all permanent foundations.
Base your choice on the size and type of shed you want to build. What you’re going to store in it, what the location requires, and your budget also affects your decision. A small shed has different requirements than a large one. The open bottom or built-in shed floor, sloped or flat ground, all affect your choice.
Hopefully, this article has provided you with information to make your decision easier.
Your comments are appreciated. If you know someone who is thinking about building a shed foundation, share with them if you liked it.
Please make sure to check out my post about different shed roof styles.
