
Building a deck is a great way to create outdoor living space. But did you know you could use different deck board patterns to enhance its aesthetic appeal and step up its WOW factor? If you’re wondering about ways to enhance the look of your deck, we’re here to help!
A standard joist spacing will easily support a horizontal, staggered, pinstripe, or multi-width pattern. However, a diagonal, picture frame, transitional, herringbone, tile/patchwork, chevron, or inlay pattern typically requires alternate joist spacing and additional blocking. Each pattern changes the look and adds style to your outdoor space.
In this guide, we explain different deck patterns, their complexity, and identify some pros and cons for each pattern. Our aim is to provide you with the information to make the best choice for your deck project.

Quick Navigation
11 Deck Board Patterns
Deck board patterns may be done with pressure treated lumber, cedar, redwood, Ipe, or other exotic woods, or using composite or synthetic boards. The designs can even be created by mixing wood species, types, or colors. However, it’s important to note that some patterns require different joist layouts, so the decision on the pattern should be made prior to starting construction.
The type of decking and length of boards used often affect the cost as well as the look. So, if your budget is tight but you want to create a wow factor, deck patterns may be just what you need. You may even choose several patterns to create different outdoor ‘rooms’ or for visual effects. For each pattern, we provide a description, some installation details, complexity level, and some pros and cons.
1. Standard Horizontal Decking

Standard horizontal decking of the same width runs perpendicular to the joists, which are typically perpendicular to the beams and/or ledger board. It’s the most common style for freestanding or attached decks and is usually parallel or perpendicular to the house. The joists may be 12”, 16”, or 24” apart depending on their span and the decking’s thickness.
The dimensions of the deck may determine the layout of the joists and decking, but long lines can visually make the deck look longer and narrower. Solid wood decking is typically available in 2-foot increments from 8’ to 16’, although they can be ordered up to 24’ or more.
Composite or synthetic decking is usually available in 12’, 16’, or 20’ lengths, but may also be specially ordered in longer lengths. The pattern commonly uses boards the same length as the deck, so there are no butt joints.
Complexity Level: Easy
Pros
- Easy to layout
- Straight cuts only
- Limited to no waste
- The pattern is easy to sweep or shovel clear
Cons
- Pattern lacks visual appeal
2. Diagonal

Decking can be laid out in a pattern diagonal to the joists. The pattern changes the look of a boxy deck, but also makes it stronger and sturdier, and controls lateral sway. Planks may be laid out at 30°, 45°, or 60° to the joists. However, the joist spacing may need to be 16” OC or even 12” OC to ensure proper support and no bounce. Laying the decking diagonally will also reduce the number of butt joints on a long deck too.
A diagonal pattern requires more layout planning to minimize waste and also requires more cuts, so increased time and labor. To reduce the time cutting, it is possible to fasten decking so it overhangs the edges, and then trim them all to size using a circular saw.
It’s common to start with long or full-length boards running corner to corner or in the middle and work outward. However, it is important to square the deck so all miter cuts are the same.
Complexity Level: Moderate
Pros
- Sturdier
- Less deck sway
- Visually less boxy
- Reduced butt joints
Cons
- Miter cuts and increased waste
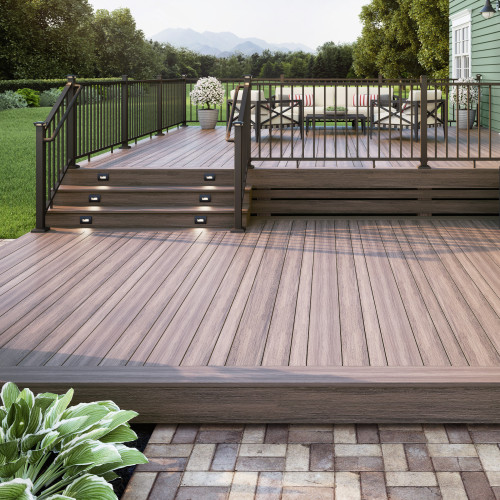
3. Picture Frame
A picture frame is a great way to hide and protect the ends of composite or solid wood decking. Since two faces of the picture frame run perpendicular to the ends of the decking, transitional or support blocking and/or an additional joist or two are required. The ends of the planks used for the picture frame are commonly mitered to hide their ends, so it is important that the deck is properly squared.
A picture frame provides a nicely finished edge without distracting from any other features. It can be used with standard horizontal and other decking patterns to enhance the finished look. Add some pop by using planks of a contrasting color or boards of different widths, or make the picture frame wider by using two planks. Maybe even match the deck fascia to create a horizontal and a vertical picture frame.
Complexity Level: Moderate
Pros
- Hides and protects the ends of decking
- Provides a finished look
- Easy to customize
- Won’t distract from other features
Cons
- Miter cuts and more framing material
4. Staggered Decking

Staggered decking is similar to the standard pattern in that the decking is laid parallel to the structure on a joist framework perpendicular to the building. It may be freestanding or attached but it is usually a long deck that requires more than one length of board to run from one end to the other. As a result, planks will need to be butt joined and will share a joist for end support.
There are several ways the decking can be laid out to minimize waste. It isn’t advisable to have all the joints on one center joist, though, as it can weaken and damage the joist and creates an unsightly seam.
Laying out the decking by staggering different lengths of boards allows for the use of shorter, less expensive boards to create an aesthetically pleasing and less obtrusive pattern than the center seam. Use different lengths to create a step, zigzagging, Navaho, diamond, or another butt joint pattern. It is usually best to draw it out on paper first, though. You may also want to color code the different lengths; this will assist with placement identification and the number of boards to cut in each length.
Complexity Level: Easy to Moderate
Pros
- Use shorter, less expensive decking
- Aesthetically pleasing butt joint pattern
- Sturdier than single-seam placement
- Customizable
Cons
- Creating a pattern and cuts
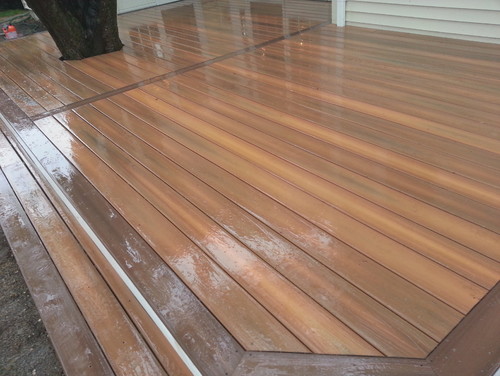
5. Transition Board

A transition board is an alternative to a center butt seam or staggering the decking joints. It uses one, two, or more planks laid parallel to the center joists and perpendicular to the deck boards. This allows for the use of shorter boards and no distracting butt joints, and can also visually separate your deck into two ‘rooms’. Transition boards also hide and protect the ends of the deck boards, and is ideal for composite or synthetic decking.
Depending on the width and number of transition boards, some adjustments may be needed with the joist spacing. Plus, extra blocking support between the two center joists to support the parallel running transition planks. The planks may be the same width and color as the rest of the decking, or they may be different. Transition boards also work well with a picture frame.
Complexity Level: Easy to Moderate
Pros
- Hide and protect end joint
- More aesthetically appealing than a center butt joint
- Use less expansive shorter decking
- Visually create two ‘rooms’
Cons
- Require additional blocking and possible joist adjustment
6. Pinstripe
A pinstripe pattern is similar to the standard horizontal pattern, but instead of using decking all of the same widths, it uses both narrow and standard or wide plank widths to create the pinstripe effect. A repeating pattern of two narrow and one wide plank will offer a visual appeal that breaks up the standard pattern. It also makes the deck look narrower too.
This pattern uses standard deck framing but will require more fasteners and installation time due to the narrower planks. Less commonly used, it provides a touch of sophistication over standard, staggered, or diagonal patterns but won’t detract from other décor or features. The pinstripe pattern can also be finished with a picture frame too.
Complexity Level: Easy
Pros
- Uses a standard framework
- Visually appealing
- More sophisticated finish
- Won’t detract from décor or other features
Cons
- Require more fasteners and installation time
7. Herringbone
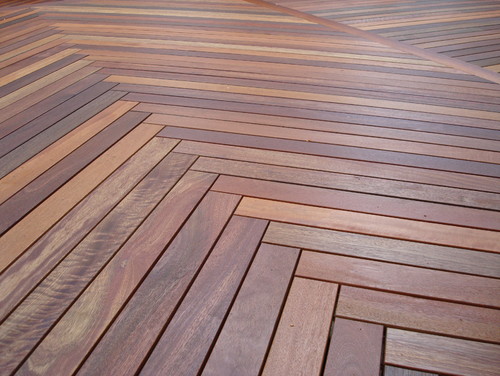
A herringbone pattern is more intricate and complex and creates an interlocking crisscross pattern that looks like woven fabric. The pattern uses shortened planks of the same length meeting at 45° or 90° to form a repeating 90° zigzag pattern.
The more complex pattern requires that both ends of each plank be cut at 45° so they form a 90° joint that can utilize a single joist. An easier pattern has the ends of the boards square cut so they end-side meet to form the 90° angle. To ensure the ends of the easier pattern are fully supported, it’s common to sister the joists where the pieces join together.
This is a detailed and elegant statement-making pattern. It is often a focal point of the deck and showcases the carpenter’s skills. This pattern hides and protects the end cuts of the boards, so it works well with solid wood, composite, and synthetic decking.
Angling the decking commonly requires the spacing between joists to be narrower, and sistering joists also add to the cost. The extra time to cut, install, and fasten the pattern may be another budgetary concern too.
Complexity Level: Advanced
Pros
- An elegant and detailed pattern
- Ends are hidden and protected
- High wow factor
- Uses shorter decking, so cost saving
Cons
- More complex and costly
8. Tile / Patchwork

A tile or patchwork pattern, also known as parquet or basketweave, uses groups of short deck boards to form squares that are laid perpendicular to each other to form a geometric tic-tac-toe or checkerboard look. All boards are cut the same length and all cuts are right angles.
The shorter the length, the smaller the squares, which can make a small deck look larger, but entails more work. The pattern typically uses 12” to 48” lengths depending on the overall dimensions of the deck. However, joist and blocking, plus layout, typically makes this a more costly design.
A pattern made up of 2-foot pieces will typically require four 6” (nominally) wide planks, or one 8-foot deck board cut into quarters. So, it can be made using less expensive shorter planks. The design requires that the joist structure be modified to maximize support. Plus, additional blocking needs to be used to support the squares running parallel with the joists too.
The pattern has clean, crisp lines and creates a sense of style and playfulness. The pattern may be accentuated by using boards of contrasting colors to make the differently oriented squares and often includes a picture frame border as a finishing touch.
Complexity Level: Advanced
Pros
- Cut ends are hidden and protected
- A stylish yet playful pattern
- Uses shorter less expensive decking
- Makes small decks look large or vice-versa
Cons
- More blocking, joist planning, and fasteners
9. Chevron With Transition Board
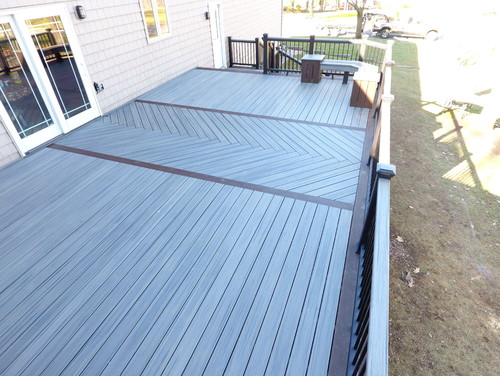
A chevron pattern can be done in a variety of ways, but the use of a transition board of a contrasting color highlights the pattern and adds a classy element. The deck boards are commonly cut at 45° to butt together and form a 90° angle or ‘V’.
It’s common to sister the joists where the pattern meets to provide better end support and nailing surface. The diagonal pattern strengthens the deck and reduces lateral movement and sway. However, joist spacing, sistering, and blocking to support the transition board(s) affect the budget.
A transition board or two is often used to separate the ends of the chevron where they meet at the center of the deck to create a split pattern. Adding a transition board perpendicular to the center transition board to create a ‘+’ creates a four-corner or room pattern too.
Alternatively, the transition boards can run diagonally from corner to corner to split the deck into four quadrants or create a center focal point. If your preference is to minimize waste, then cut all the boards the same length and use multiple transition boards to carry the chevron pattern across a long, narrow deck.
Complexity Level: Moderate to Advanced
Pros
- Stronger more stable deck
- Definite WOW factor
- An easily adaptable, versatile pattern
- Can create a central focal point
Cons
- More blocking, joists, 45° cuts, and fasteners
10. Deck Inlay Patterns

An inlay pattern often adds a touch of color and flair to a deck, as well as a focal point. The size and complexity of the inlay also generate challenges too. The inlay may have components that are curved, wedge-shaped, or have multiple angles or edges that must be supported and fastened. So, inlays should be part of the planning stage as extra blocking and joist spacing may be necessary.
The style or type of inlay offers endless possibilities for customization and may create a dynamic central focal point, or be part of a unique repeating pattern. Inlays often add alternate lines to a deck and may be part of the overall decking pattern, or be framed within a contrasting diamond or square within the deck. The style, effect, and WOW factor add flair and make a personal statement about your outdoor space.
Complexity Level: Moderate to Advanced
Pros
- Adds style, flair, and a focal point
- A personalized statement
- Increased WOW factor
- Multiple options
Cons
- Complexity, added materials, and increased waste
11. Multi Width Decking
Multi-width decking patterns are another way to enhance your outdoor space. The patterns may be simple or complex. But it often depends on the availability of different widths. Dimensional lumber is available in nominal widths of 2”, 4”, 6”, 8”, 10”, and 12”, while some high-end composite or synthetic decking comes in 3.5”, 5.5”, and 7.25”. So, multi-width patterns can be created with natural or man-made materials.
Similar to the pinstripe pattern, the layout takes some thought and planning but can be applied to a standard deck frame. The pattern may be a repeat of two or three widths, or a blend of multiple widths in an irregular pattern. If using composite decking, consider using two shades of the same color to create a unique pattern.
Complexity Level: Easy to Moderate
Pros
- Uses the standard joist framework
- Visually appealing sophisticated finish
- Can use solid wood, composite, or synthetic decking
- Enhances outdoor space without detracting from décor or other features
Cons
- Maintaining pattern and more fasteners
What Is the Best Deck Board Pattern
Deck patterns offer a unique way to enhance your outdoor space and wow friends and family. Patterns can offer sophistication or simplicity that matches your lifestyle. Patterns that utilize a standard joist framework are easier for the DIYer but may require some planning and extra cutting. More complex patterns often require more planning, extra joists, and additional blocking to provide support and fastening surface. They may also generate more waste.
Drawing out the pattern on grid paper and even color-coding common widths or lengths helps to visualize the look. It is also beneficial for designing the joist framework, as well as when purchasing, cutting, and installing components.
If doing the work yourself or hiring a pro, budget and time are often a factor as to which pattern to choose. As to which is the best deck pattern, that depends on you. Hopefully, you have a better awareness of some of the decking pattern possibilities and are ready to make your design decision.