
Building a shed is a simple enough process, once you get past the foundation. Generally, shed foundations are built from concrete, either pre-cast blocks or a poured pad. This is expensive, laborious, and time-consuming. No wonder so many people don’t want to mess with it!
Luckily, a new option has emerged that solves many of the problems of a concrete foundation. A plastic shed base is cheaper, less labor-intensive, and not susceptible to water damage.
In this article, we’re going to discuss what a plastic shed base is, how it works, and all of the benefits and drawbacks that accompany it. Then, I’m going to review some of the best plastic shed bases on the market to help you decide if it’s the right fit for you.
Top Pics for Best Plastic Shed Base
- TRUEGRID PRO Plus (1.8inch Depth) Permeable Pavers
- TRUEGRID PRO LITE (1inch Depth) Permeable Pavers
- Standartpark - EasyPave Grid - 2inch Depth Permeable Paver System
- Standartpark 2
- Standartpark Geo Grid 4 inch thick
- Techno Earth ( 1.9inch Depth ) Permeable Grass Pavers
- DuraGrid DT40BEIG Outdoor Modular Interlocking Multi-Use Deck Tile
Quick Navigation
What is Plastic Shed Base
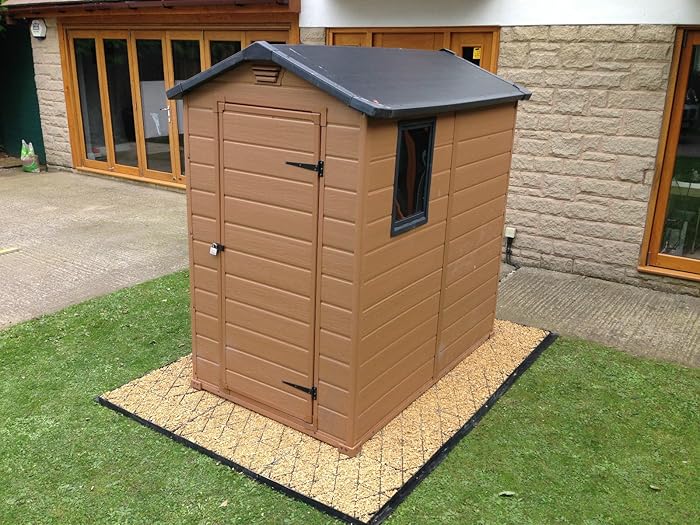
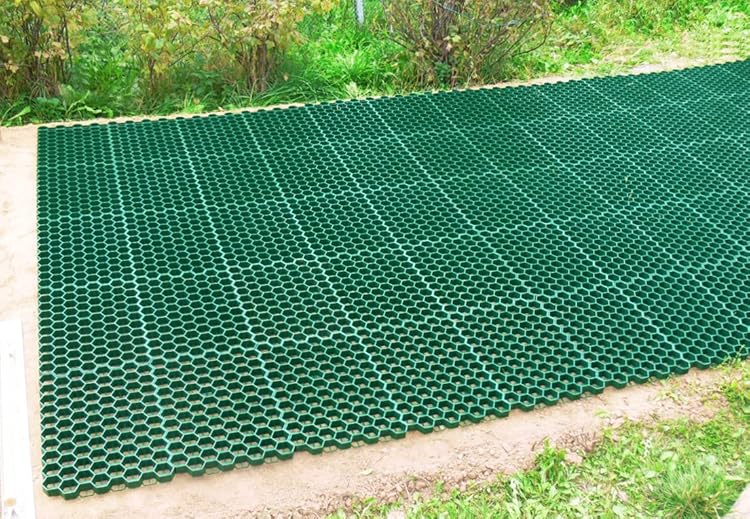
Plastic shed bases are relatively new, and they provide many advantages over traditional concrete foundations. A plastic shed foundation is comprised of plastic pieces that snap together quick and easy and don’t require screws or nails to hold it together. Despite this, they’re very heavy duty and can hold plenty of weight.
Once snapped together, the plastic base forms a grid pattern. The inside of the grids are filled with pea gravel to provide extra weight and stability for larger sheds, but smaller sheds are fine on just the plastic base.
The base plastic used to build these items is generally recycled plastic from old garbage containers. This means that a plastic shed base is more environmentally friendly than a foundation built of concrete.
The Benefits of Plastic Shed Foundation
Durable
You may not think of plastic as the most durable material for holding up large amounts of weight, but it actually is. The grid shape in which they’re installed adds extra strength and makes them able to support weight similar to a cement foundation.
Plastic is not susceptible to water damage like wood and concrete, so it doesn’t sweat, absorb water, rust, corrode, or anything else. The resins used in a plastic bases for sheds are also UV-resistant to protect them from becoming brittle in the sun as other plastics do.
Ultra-Lightweight
One of the big disadvantages of concrete is the massive weight! Whether you’re mixing up bags of concrete or lugging around cement blocks to prop your shed upon, it’s going to be a very labor-intensive job. Who really wants to carry a dozen or more heavy cement blocks from the truck to the backyard?
Plastic, on the other hand, is very lightweight and a single person should have no problem carrying the entire foundation by themselves, even if you’re going to have to walk a little way.
Distributed Load
Since a plastic foundation is comprised of so many interlocking squares, there are many more points of contact for your shed to lay on than with other types of foundations. Each corner of each grid square can be a contact point.
These contact points are much closer together than what you’d get using concrete blocks for the foundation. This results in the weight of the shed being spread out and evenly distributed across all the points of contact.
Solid Foundation
Once clipped together, shed foundations made of plastic are very heavy-duty and create a solid foundation. It’s nearly as strong as a concrete slab, and it’s even less susceptible to the elements. Especially when compared to a concrete block foundation, which has considerable spacing between each support, a plastic foundation is very solid and provides ample support.
Water-Proof
Wood and concrete are both very susceptible to the elements, unlike a plastic shed base. Concrete absorbs water and eventually sweats it out, which can corrode and rust nails as well as introducing water to the wood of your shed which is prone to warping and rotting.
Plastic does not absorb or hold water though, so it completely circumvents this issue. It won’t later leak water onto your wood or fasteners and cause premature damage from the elements.
Eliminate Splashing
One problem with sheds built on concrete riser blocks is that raindrops can hit the ground and splash up underneath the foundation. This can result in soaking of the timber frame and potentially causes rot, warping, and even mold. Since a plastic shed base is solid, it leaves no areas in which water could splash up underneath the shed. This means your shed will last longer and you’ll experience far fewer issues down the line. Make sure to fill the grids with pea gravel to eliminate all splashes.
Provides Ventilation
When constructing a shed on a concrete base or even paving slabs, the solid nature of the foundation leaves no room for air to reach the underside of the shed. Once moisture accumulates in the base timber of your shed it will have no way of drying out without any ventilation.
Since a plastic shed base is built in a grid pattern, there is plenty of room for air to reach up underneath the foundation to ventilate the wood or metal at the base of your shed.
Quick and Easy Set-Up
Traditional cement foundations require a lot of prep and labor to complete. You’ll have to start by leveling the ground, digging footers, pouring a pad or laying cement pavers. If you pour a concrete slab, you’ll have to finish it and allow ample drying time. This is all very time-consuming.
A resin shed foundation, on the other hand, sets up quick and easy and requires very little labor. The pieces snap into place and fasteners are generally not required. There’s also no dry time, so once it’s set up you’re ready to build!
Rodent-Proof
Thanks to the interlocking grid design of a resin foundation, there is nowhere for a rodent to crawl in and get to the bottom of your shed. Since the shed base is tight up to the floor of the shed, they would have to chew through many pieces of plastic, which isn’t very feasible. If you have had issues with rodents in the past, a plastic shed base may be the solution to your problems.
Environment-Friendly
Shed bases made of plastic are most often built from recycled plastic garbage cans. This means you’re helping reduce waste by using them.
These are eco-friendly plastics that can be recycled once again when you’re finished with them, perpetuating the positive cycle more. Moreover, they won’t rot or release chemicals into the ground either, so it’s safe for all of nature.
Affordable
Compared to the cost of enough concrete to pour a slab or purchasing pavers or cement blocks, a plastic shed base is dirt cheap. For most, pouring a concrete slab is more than they can handle and a professional will have to be hired. A plastic shed base can be installed by almost anyone, so you can also save the money you would have spent on a professional.
Movable
One of the biggest disadvantages of a traditional foundation is that once it’s laid, it’s permanent. There’s no moving it once it’s done, and even removing it would be a major headache.
With a foundation made from plastic, you have the freedom to move it anywhere at any time. Once you remove any anchors and gravel that are holding it down, you can simply pick it up and move it. In fact, you can even take it apart if you’re careful with the interlocking tabs, and reassemble it somewhere else.
Disadvantages of Plastic Kits
Lightweight
On one hand, being lightweight is an advantage for all the reasons described above. On the other, it can also be a drawback.
Unless you fill your plastic shed base with pea gravel, it will be light enough to migrate while you are building your shed. This may result in the finished shed being out of place from where you planned. By filling all of the grid holes with pea gravel though, you’ll weight it down, make it more secure, and even protect against rain splashing.
No Built-in Anchor Spots
Even if your shed base is filled with pea gravel and solidly held to the ground, the shed on top still needs to be secured so it can’t move. More than just for safety and longevity, it’s also code.
One effective method of anchoring your shed to the ground beneath the base is to use auger style shed anchors. This is a long rod with an auger bottom that screws into the ground. These can be a bit of a pain, but they are effective and not very expensive.
Best Plastic Shed Base Reviews
Options for USA
1. TRUEGRID PRO Plus (1.8″ Depth) Permeable Pavers

TRUEGRID PRO Permeable Pavers are as strong as concrete at a fraction of the weight. More than just a shed base, they can be used to build parking lots, sidewalks, and more.
This product works in all soils and climates. They can even be filled with dirt and grass and used to make a level field.
With a compression strength of 1 million pounds per square foot, they’re strong enough to withstand any abuse you can throw at them. Despite the high strength, flex joints serve as built-in expansion joints to account for seasonal changes and ground movement.
 The TRUEGRID PRO Plus pavers require no maintenance. Once they’re installed, you can forget about them, they will no longer need your attention.
Installation is quick and easy with the 3-point locking tabs that clip into place connecting each paver to the next. The X-anchors will secure the entire plastic base when pea gravel is used to fill them, no staking needed.
With a lifespan of 60 years, you can rest assured that your plastic shed base will lead a very long and productive life devoid of maintenance issues.
The TRUEGRID PRO is available in two versions, PLUS and LITE.
The TRUEGRID PRO PLUS has a depth of 1.8 inches and an overall size of 24”X24”. It’s available in a pack of ten that covers 40 square feet.
The TRUEGRID PRO LITE comes in a 1-inch depth with the same 24”X24” dimensions of the PLUS. It comes in an 18-pack that covers 72 square feet.
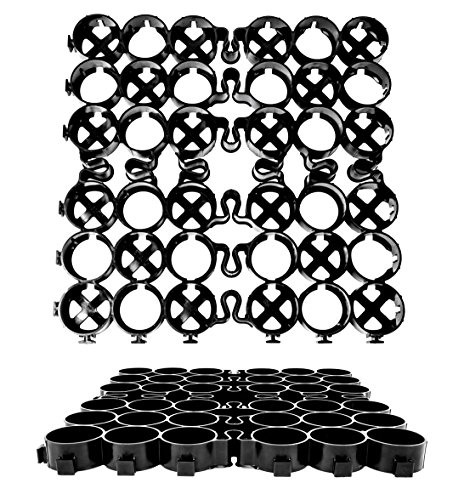
2. Standartpark – EasyPave Grid – 2″ Depth Permeable Paver System
Filled or empty, the Standartpark EasyPave Grid has an 88,000-pound load capacity. Even better, the push and lock connection system makes sure that your pavers will never disconnect or migrate from each other, even under the heaviest of loads.
Designed to be taller than the competition, the Standartpark plastic pavers are 2 inches deep. This allows you to add more filler to them, resulting in a stronger and more secure shed base. They can be filled with gravel, sod, or dirt, so you can use them to build anything from a driveway, to a field, or a shed.
These plastic pavers are available in packages of 20, 50, 100, or 300 square feet, depending on how much space you need to cover.
 For those worried about their impact on the environment, this paver system is built entirely from 100% recycled polymer. This means you’re helping reduce our footprint in the short and long term since these can be recycled again once you’re finished with them.
The sizing is a bit irregular at 26”X18”, and personally, I prefer a square pad to simplify things. That said, this rectangular shape may be more suitable for certain projects, so it’s something to keep in mind.
One of the standout features of the Standartpark plastic pavers is that they can actually work on an incline thanks to the patented wave-flex design. That said, you still won’t want to mount your shed on an incline, so it’s best not to place your plastic shed base on uneven ground.
3. Standartpark 2″ Thick Geo Grid
With a strength rating of 1885 pounds per square foot, the Standartpark Geo Grid is strong enough to use for driveways and parking lots, so a garden shed or tool shed will be no problem. They’re made of recycled polyethylene that’s supersonically welded together. This makes it environmentally friendly as well as heavy duty.
Depending on how high you’d like your shed to be raised, the Standartpark Geo Grid is available in a 2-inch or 4-inch depth depth. Even better, these grids can are very easy to install since they can be cut and attached to each other to form any shape and size you require.
While it is quick and easy to install, the base plastic used to construct these grids is very flimsy when it’s on its own and will get most of its stability from the fill you place inside. Since they’re so lightweight, you’ll need to stake the grids down before filling them so the gravel doesn’t just come out from the bottom.
Each pack includes 160 square feet of Geo Grid. This is enough to cover an area that’s 9’X17’ total. Most sheds will be under this size so one pack should perform your whole project.
For maximum stability, Standartpark suggests using ¾ cut gravel instead of pea gravel. The larger gravel will pack better to create a more stable surface that won’t have any give under your shed. Since these are built from a thinner recycled plastic, I’d suggest really packing it well and taking great care to ensure it’s solid before beginning the build process.
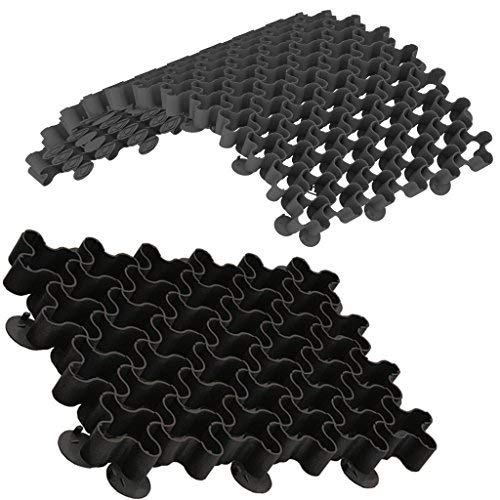
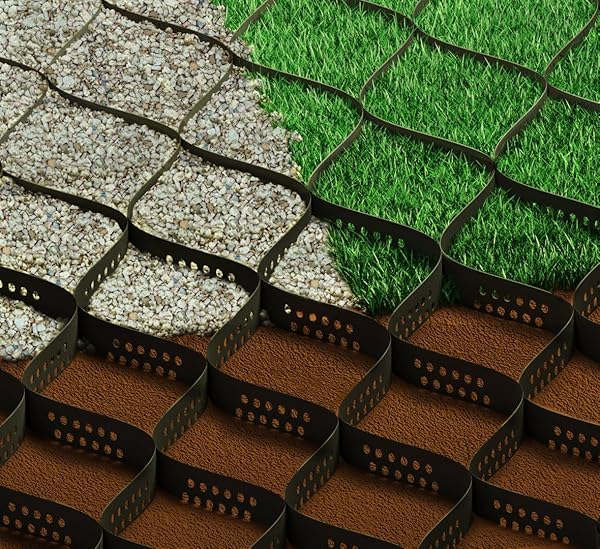
4. Techno Earth ( 1.9″ Depth ) Permeable Grass Pavers
Concrete is the foundation material by which all other shed bases will be measured. The Techno Earth permeable grass pavers have a compression strength the same as concrete, meaning they’re able to withstand 200 tons of pressure per square meter. This is strong enough to safely allow cars and trucks to drive on top, so the weight of a shed is minimal in comparison.
At 1.9 inches high, these plastic pavers are the perfect height to make a base for a shed. Each piece is about 20”X20” and a pack contains four which will equal 11 square feet once laid out.
To expand your setup, all four sides feature the snap together interlocking system making installation quick and easy with no tools necessary. Of course, you’re still going to need to level the ground first which could be pretty labor intensive.
 Once filled with gravel, the Techno Earth pavers are strong and sturdy, able to support heavy loads with ease. Better yet, they’re also very permeable and will allow for much better drainage than other types of foundations. This environmentally-friendly permeability means less flooding and runoff and a dryer shed floor.
Though they’re constructed of rigid plastic and very strong once filled, the interlocking tabs can be a bit brittle. You’ll need to be careful when snapping them together as they do break easier than expected. If you break the tabs on a piece, that side can no longer be attached to any other pieces, so it’s a good idea to take your time and be extra careful snapping them together.
5. DuraGrid DT40BEIG Outdoor Modular Interlocking Multi-Use Tile
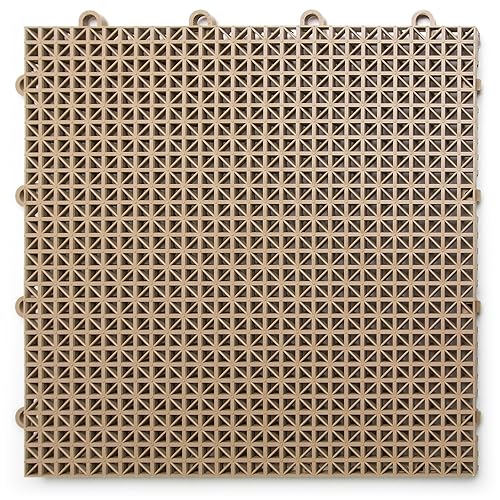
The DuraGrid outdoor interlocking tiles are a thinner option that snap together easily to create any size shed base you desire. It requires no tools to assemble and can be done very quickly by just one person.
Each tile is 12”X12” in size and ⅝” thick, and 40 of them come in a pack. This means you’ll be able to cover 40 square feet with one pack. An 8’X10’ shed will need two packs to cover enough area.
Be aware that ⅝” is not much height to raise your deck off the ground. You’re still likely to deal with water issues on such a small riser, especially in wetter climates. Potentially, you could stack them on top of each other to get a higher rise, but this could introduce stability issues.
On the plus side, the small height means it should be easy to attach your shed to the floor since you won’t have very far for an anchor to reach. You may need to create holes in the plastic though because the existing holes are likely too small to fit an anchor through.
Most of the options we’ve covered so far had gravel grids that would help to secure the paver when gravel was used to fill it. The DuraGrid does not. The holes are too small to fill with gravel anyway, so you’re going to need to use stakes to hold these down instead. Stakes are not included, so they’ll need to be purchased separately.
These plastic tiles are anti-microbial so you should experience any mold or mildew issues with them. They’re also UV-resistant so they won’t get brittle or damaged from long exposure to the sun.
Options for UK
All the options I’ve covered so far are only available in the USA. But don’t worry! That doesn’t mean you’re out of luck if you live overseas in the UK. There are still several options available for you, and these are the two that I think are your best bets.
6. CrazyGadget Plastic Shed Base
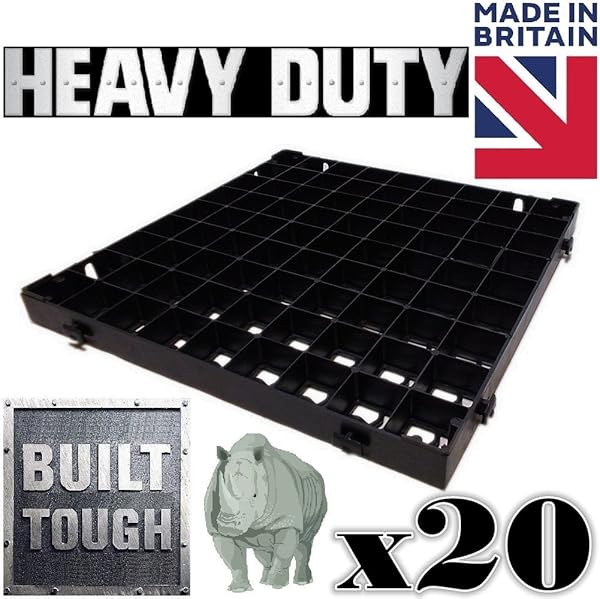
Tough and easy to install, the CrazyGadget Plastic Grid is an excellent choice for a shed base if you’re located in the UK. It’s built with heavy-duty plastic that can easily withstand the weight of a shed since it’s strong enough to be used for driveways and parking lots.
Every square of the CrazyGadget plastic grid has gravel hold-downs that will help secure the base once it’s filled. Once you fill each grid, it’s very stable and unlikely to budge.
The edges of each sheet feature interlocking tabs that snap together with no tools and require very little pressure. That said, they seemed weaker than expected and tended to break off if you’re not careful.
Making matters worse, no instructions are included, so the chances of snapping off a tab is increased. If one breaks, you won’t be able to connect that side to another tile anymore.
If you snap four grids together they’ll create one square meter. Each pack contains 20 pieces, which is enough for five square meters. You’ll likely need two packs or more to lay the foundation for a whole shed, even if it’s just a small garden shed.
Since each square of the grid is pretty sizable, you should have no problem attaching your shed to the ground beneath. An auger style anchor should easily fit through with no problems.
The biggest problem with this product is that quality control seems to lose count of how many pieces are in a pack. 20 are supposed to be included, but they often seem to ship with only 19 pieces, so check your count before you start installing.
7. Eco Deck Garden Shed Base Grid

The Eco Deck Garden Shed Base Grid is one of the best plastic shed bases available in the U.K. Unlike many of the other options that come in small squares that snap together, the Eco Deck shed base is several pieces that get held together with clips. Unfortunately, the clips are a bit finicky and didn’t mount as well as hoped and no instructions were included to clarify.
One set of this grid covers an area that’s 8’X6’. This should be plenty to fit a small shed on and you won’t need to order any more unless you wish to build a shed that’s larger than that.
While many of these plastic bases included gravel grids at the bottom so the weight of the fill will hold it down, the Eco Deck base did not. That said, once filled up to the top with gravel they were very secure and didn’t feel like there was much chance of them moving. At 3.5cm high, there’s plenty of space to pack gravel in so make sure to take advantage and stuff in as much as you can for maximum stability.
This grid is strong enough to hold hundreds of tonnes according to the manufacturer. I can’t speak to the efficacy of such a claim, but in comparison, a small shed shouldn’t even phase the plastic of this base. They’re strong enough to build driveways and patios which both withstand much harsher abuse.
One of the big concerns with plastic is getting brittle in the sun. Luckily, this Eco Deck product is UV stable, so even with years in the heavy sun it shouldn’t get damaged or brittle.
Plastic Foundation Installation
Prior to beginning your project, ensure you have all the necessary materials and tools. You’ll need a shovel, hoe, and level for preparing the ground prior to installation. You’ll also need gravel to fill the grid, and if you want to stop weeds from growing underneath, you’ll also need a weed barrier. Finally, ensure you have a way to attach the shed to the ground such as an auger style anchor.
Step 1: Excavation and Leveling
Start by removing the top layer of grass and dirt or whatever is in the place where you’re building your shed. You don’t need to go very deep, 1-inch should suffice.
Once you have removed the top layer, it’s time to level it out. A long level that’s 6’ or 8’ should suffice. Using the hoe and shovel, remove and add dirt as necessary to get the area as close to even and level as possible. If you have one available, use a tamper to solidify everything and help make sure it’s level and compact.
Step 2: Laying Your Grid
Once your area is level, it’s time to lay the foundation. If you’re using a weed barrier make sure you lay this out first so the grid will go on top.
You can start in one corner and work your way across. Go row by row installing one piece at a time. Carefully snap the interlocking tabs on one side of your grid to the tabs of the adjacent piece.
As you keep installing each piece, take the level out and make sure it’s still even. If you need to make adjustments this is your last chance, though it’s much harder with the weed barrier beneath.
Step 3: Filling the Grid With Gravel
Once all of your grid pieces are installed, connected, and leveled, it’s time to fill it all with gravel and make it permanent! Simply dump your gravel into an area and use the hoe to spread it out. It will automatically fill each hole of the grid as you move it. Be sure to continue filling until each hole is filled to the very top.
A large push broom can be very effective for the second part of this once all the holes are mostly filled. This will allow you to keep the grids full while removing the gravel that’s over the top.
Once your grid is installed and filled, you can secure it to the ground with anchors. One of the best bets is an auger style anchor that can easily reach deep into the earth below. For more information on how to anchor your shed check out my article about how to anchor a shed.
Overall, this process should only take a few hours to complete. With no drying time to worry about, your shed base is now ready!
Conclusion
We’ve covered a lot of ground in this article, if you’ll excuse my pun! We’ve discussed all of the important information you need to know about the benefits and drawbacks of plastic shed foundations, as well as how to install one. Personally, I think the TRUEGRID PRO Plus 1.8-inch Depth Permeable Pavers from the reviews section is one of the best plastic shed bases available. It’s robust enough to handle any shed and easy to install, even for someone with very little experience.
If the information in this article was helpful to you, please feel free to share it so someone else who needs this information can find it as well. If you have any questions about these shed bases or any comments for me, please leave them below so I can respond in kind.